Originality.ai Tutorial: Mastering AI Content Detection with the WordPress Plugin
Originality.ai Tutorial: Mastering AI Content Detection with the WordPress Plugin
In this Originality.ai tutorial, I’ll guide you through the powerful features of the Originality.ai WordPress plugin, designed to help content creators ensure their work is authentic. With seamless integration into your WordPress dashboard, this tool allows you to scan posts and entire sites for AI-generated content in just a few clicks.
Step 1: Intro
In today’s digital landscape, the authenticity of content is paramount. As content creators, bloggers, or website owners, we must be vigilant about the originality of what we publish. With AI-generated text evolving rapidly, distinguishing between human-written and machine-generated content has never been more challenging. That's where the Originality.ai plugin shines, providing a reliable solution directly within your WordPress dashboard.
Step 2: Getting Started – How to Install the Plugin
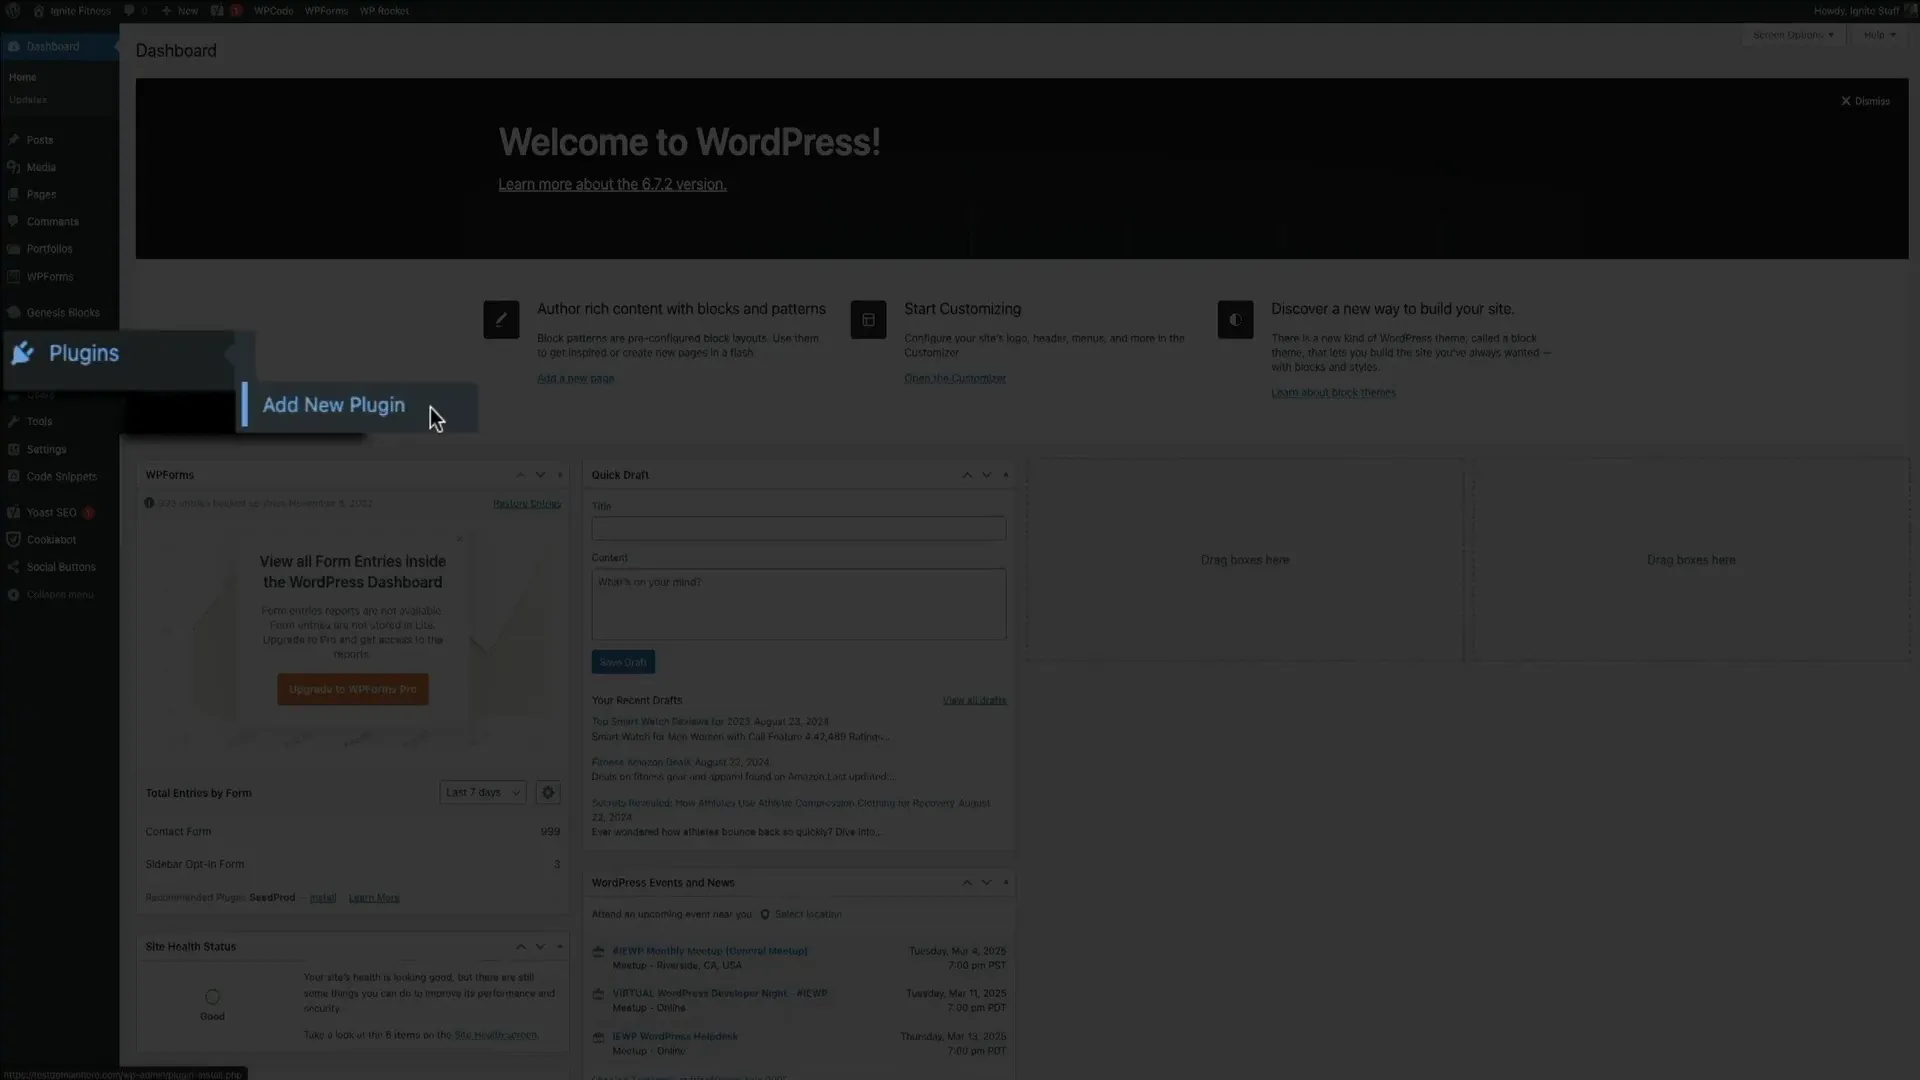
To begin your journey with Originality.ai, the first step is installing the plugin. Here’s how to do it:
- Navigate to your WordPress dashboard.
- Hover over Plugins and click on Add New.
- In the plugin library's search bar, type Originality AI. It should be the first result.
- Click the Install button, followed by the Activate button to enable the plugin.
Congratulations! You’ve officially installed the free version of the Originality.ai plugin on your WordPress site. If you want to access more features, consider upgrading to a pro plan later on.
Step 3: Account Setup
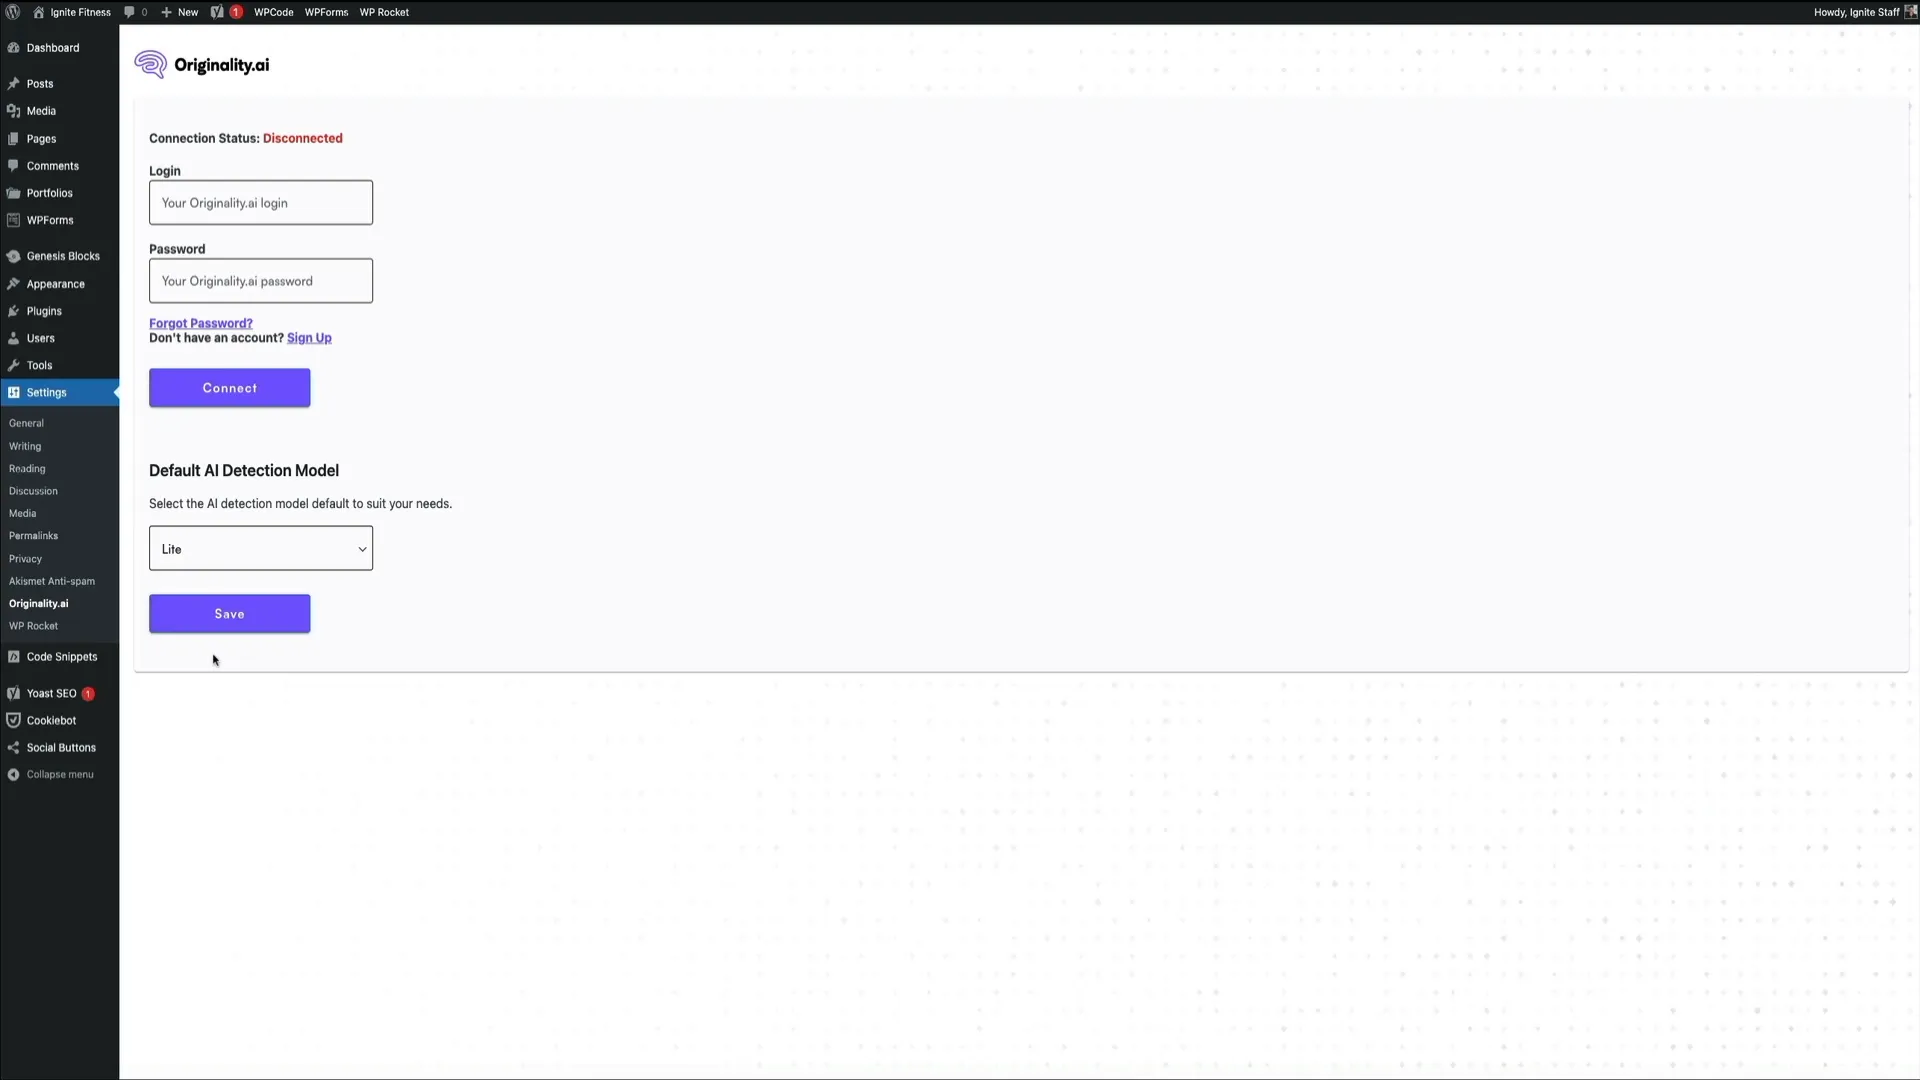
After installation, the next step is to create your Originality.ai account. Follow these straightforward steps:
- Locate the link that says click here to go to plug-in settings or hover over Settings in the left sidebar and select Originality AI.
- On the settings page, click the Sign Up link. You can either enter your email address and create a password, or sign in using a Google account.
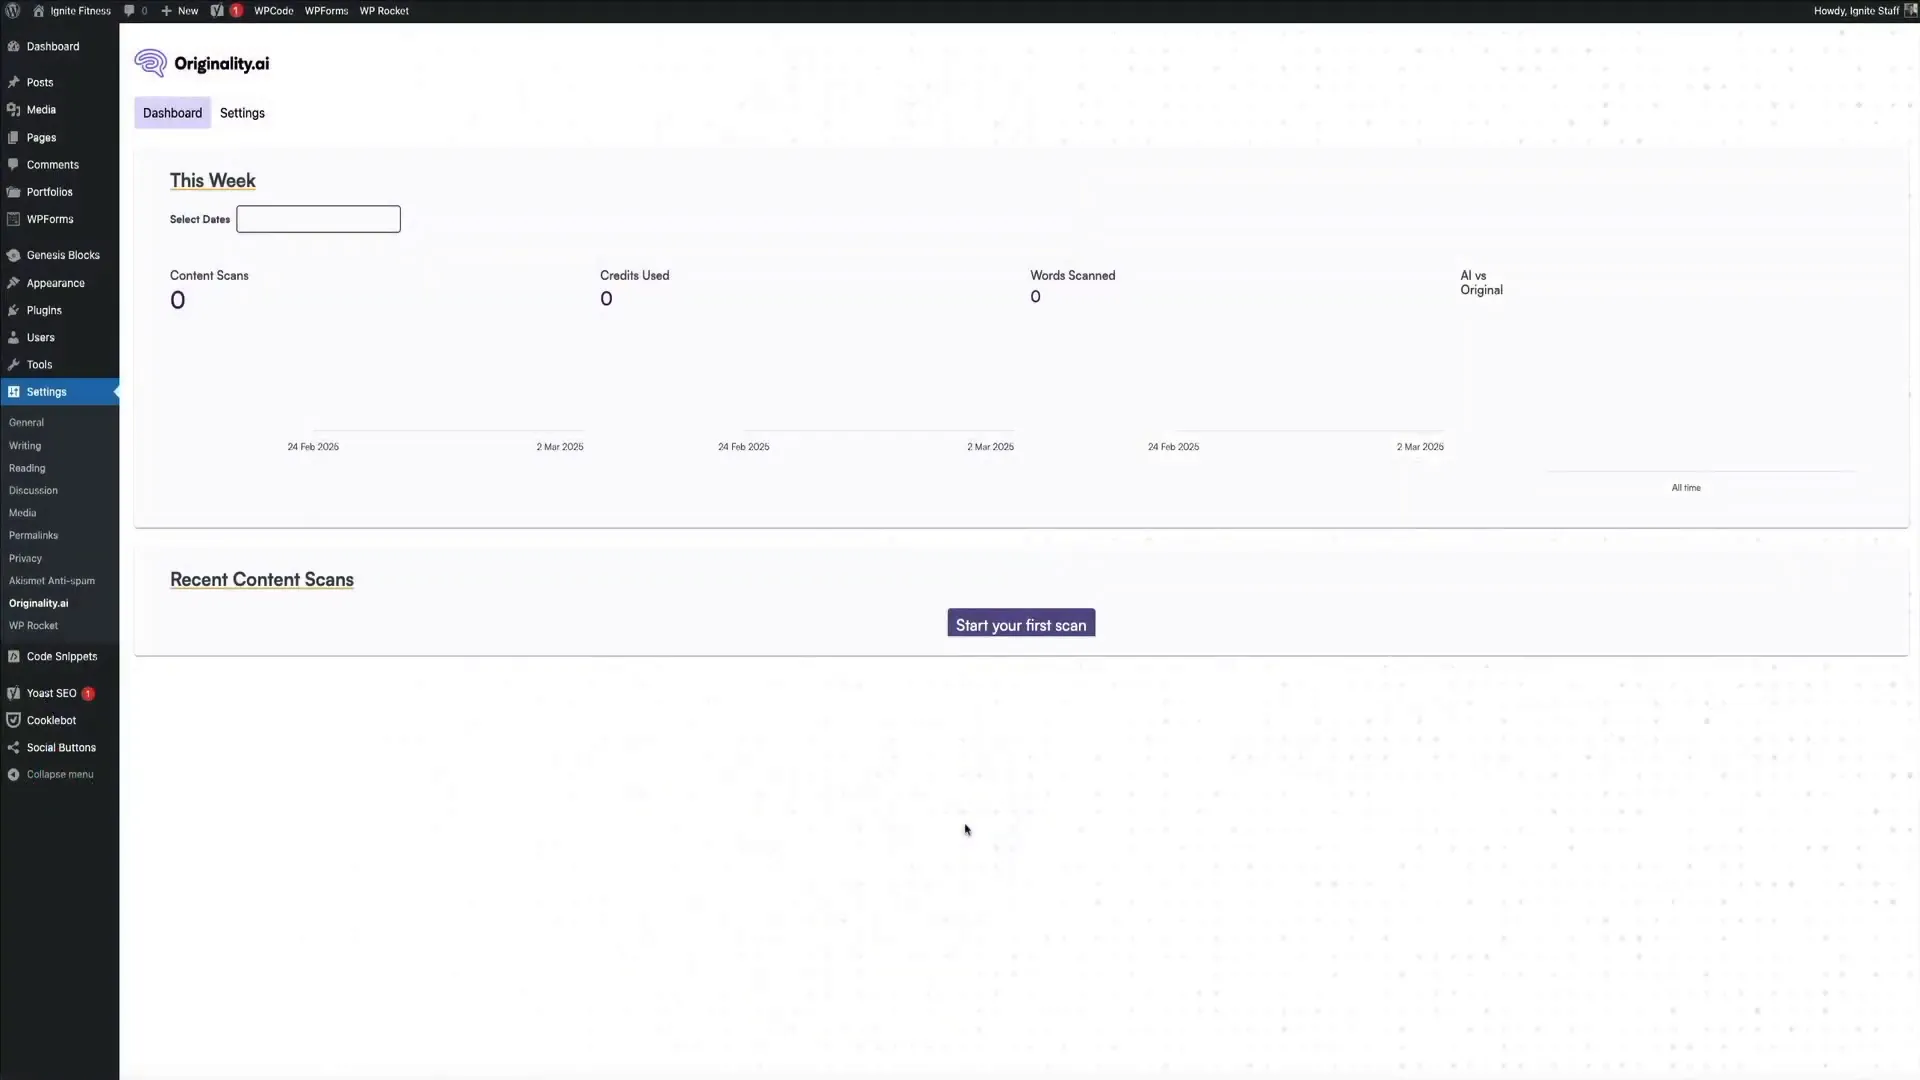
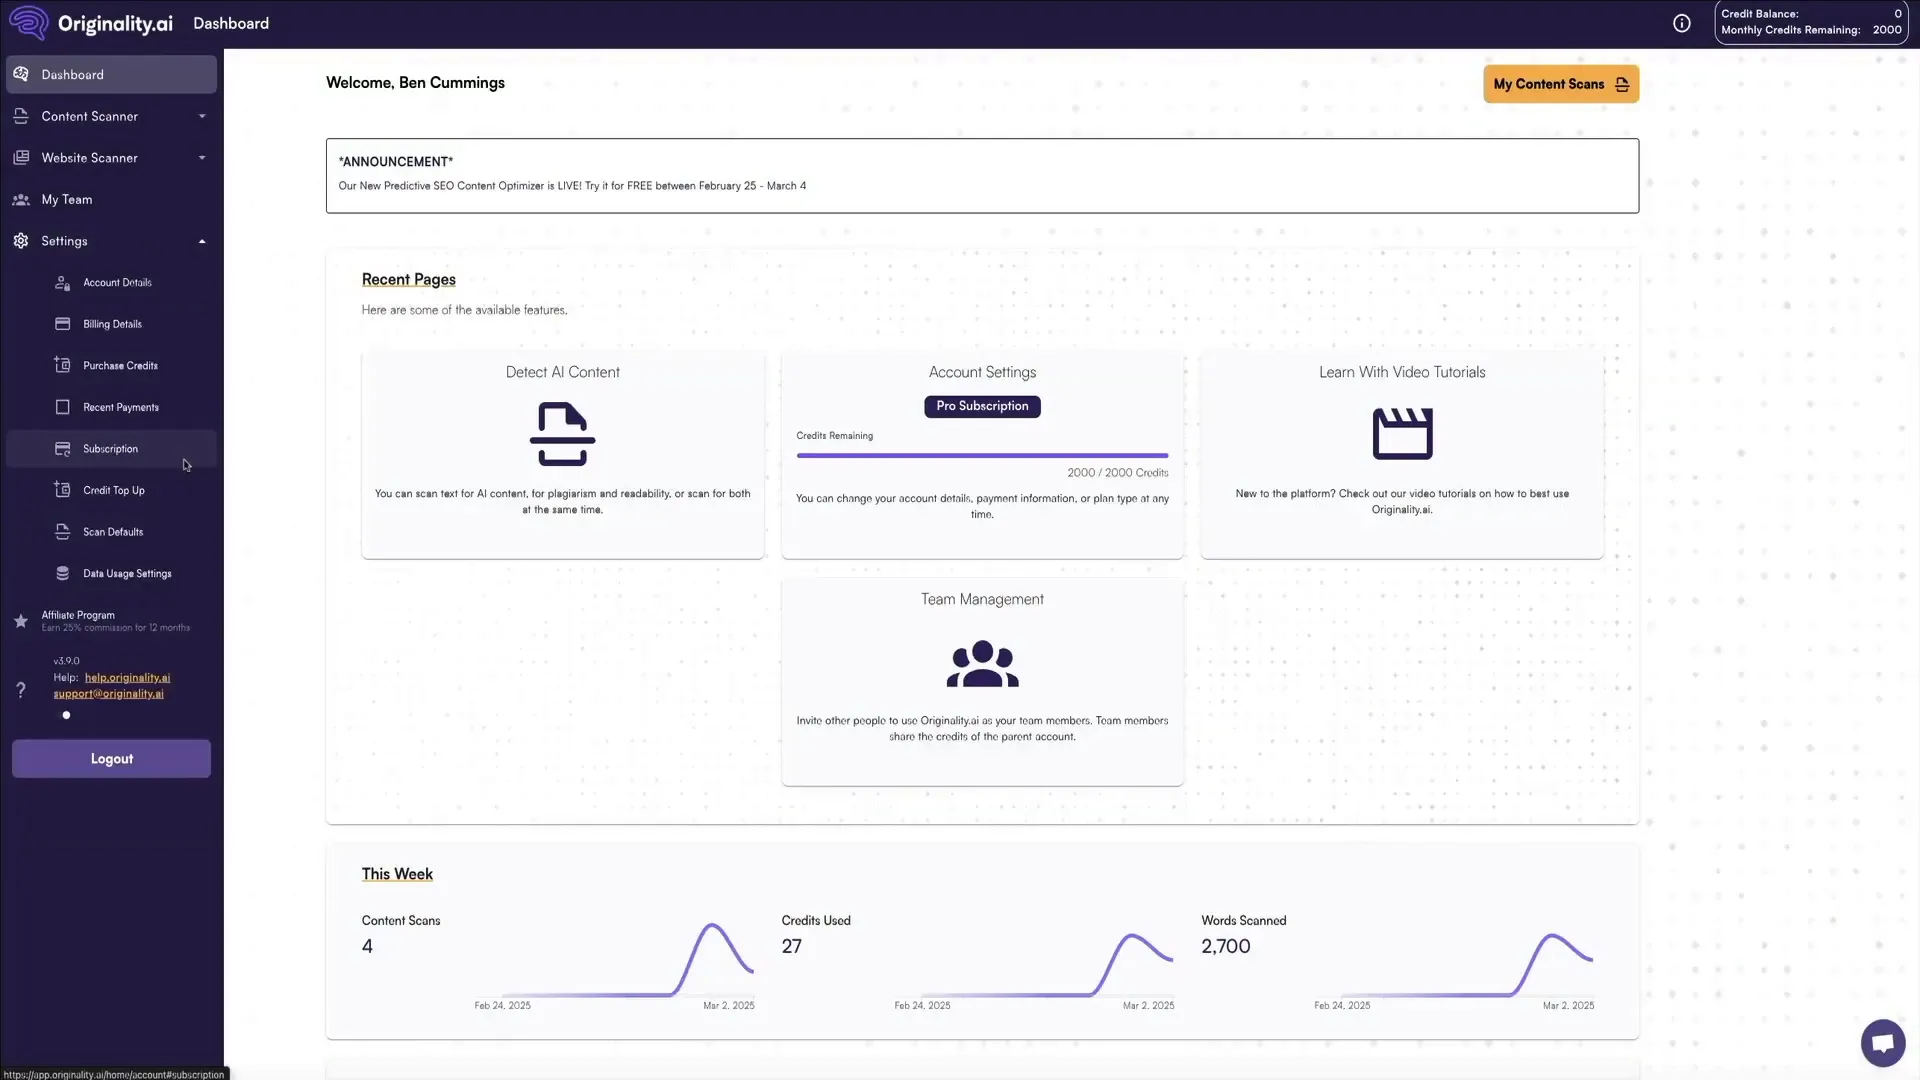
- Once connected, you’ll be redirected to your Originality.ai account dashboard. This dashboard offers a comprehensive interface for managing your scans and settings.
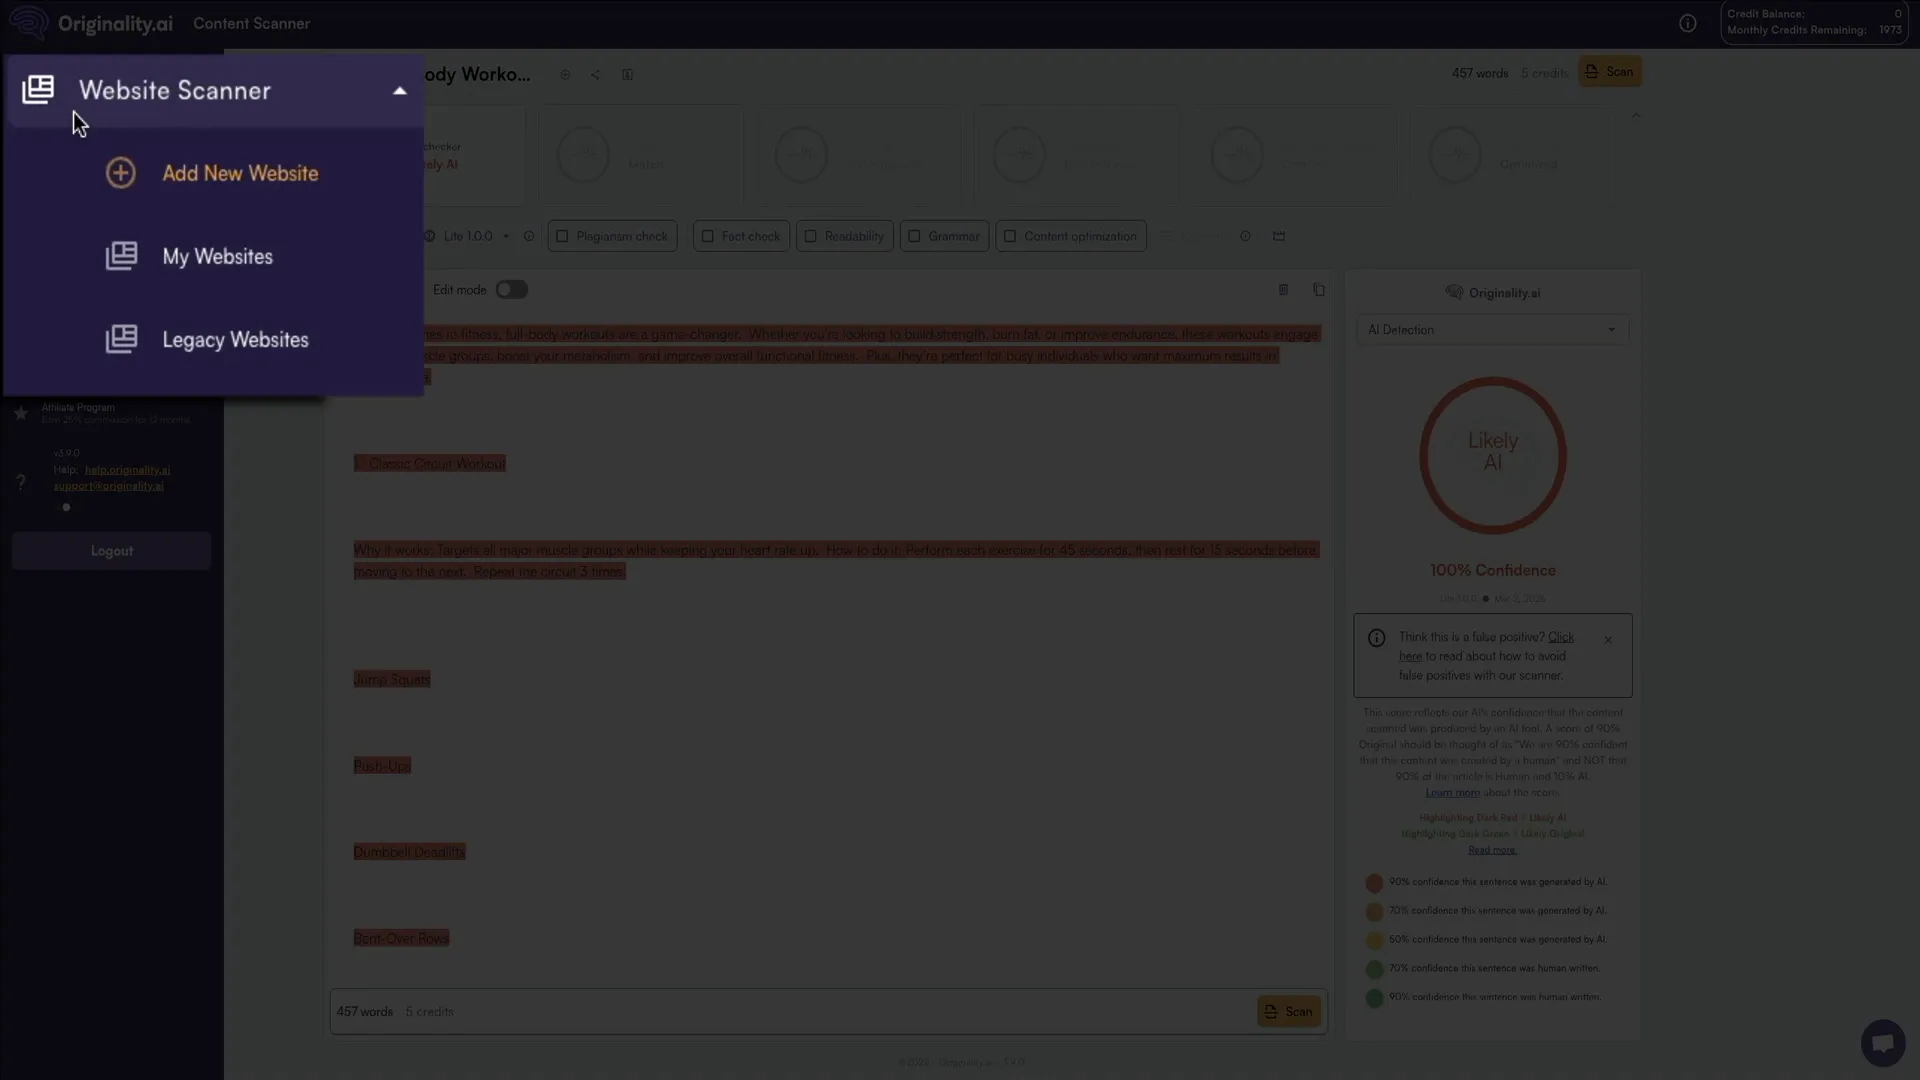
Step 4: AI Content Check
Now comes the exciting part—using the plugin to detect AI-generated content. Here’s how to get started:
- In your WordPress dashboard, navigate to the Posts section.
- Select the post you wish to scan by clicking on Edit.
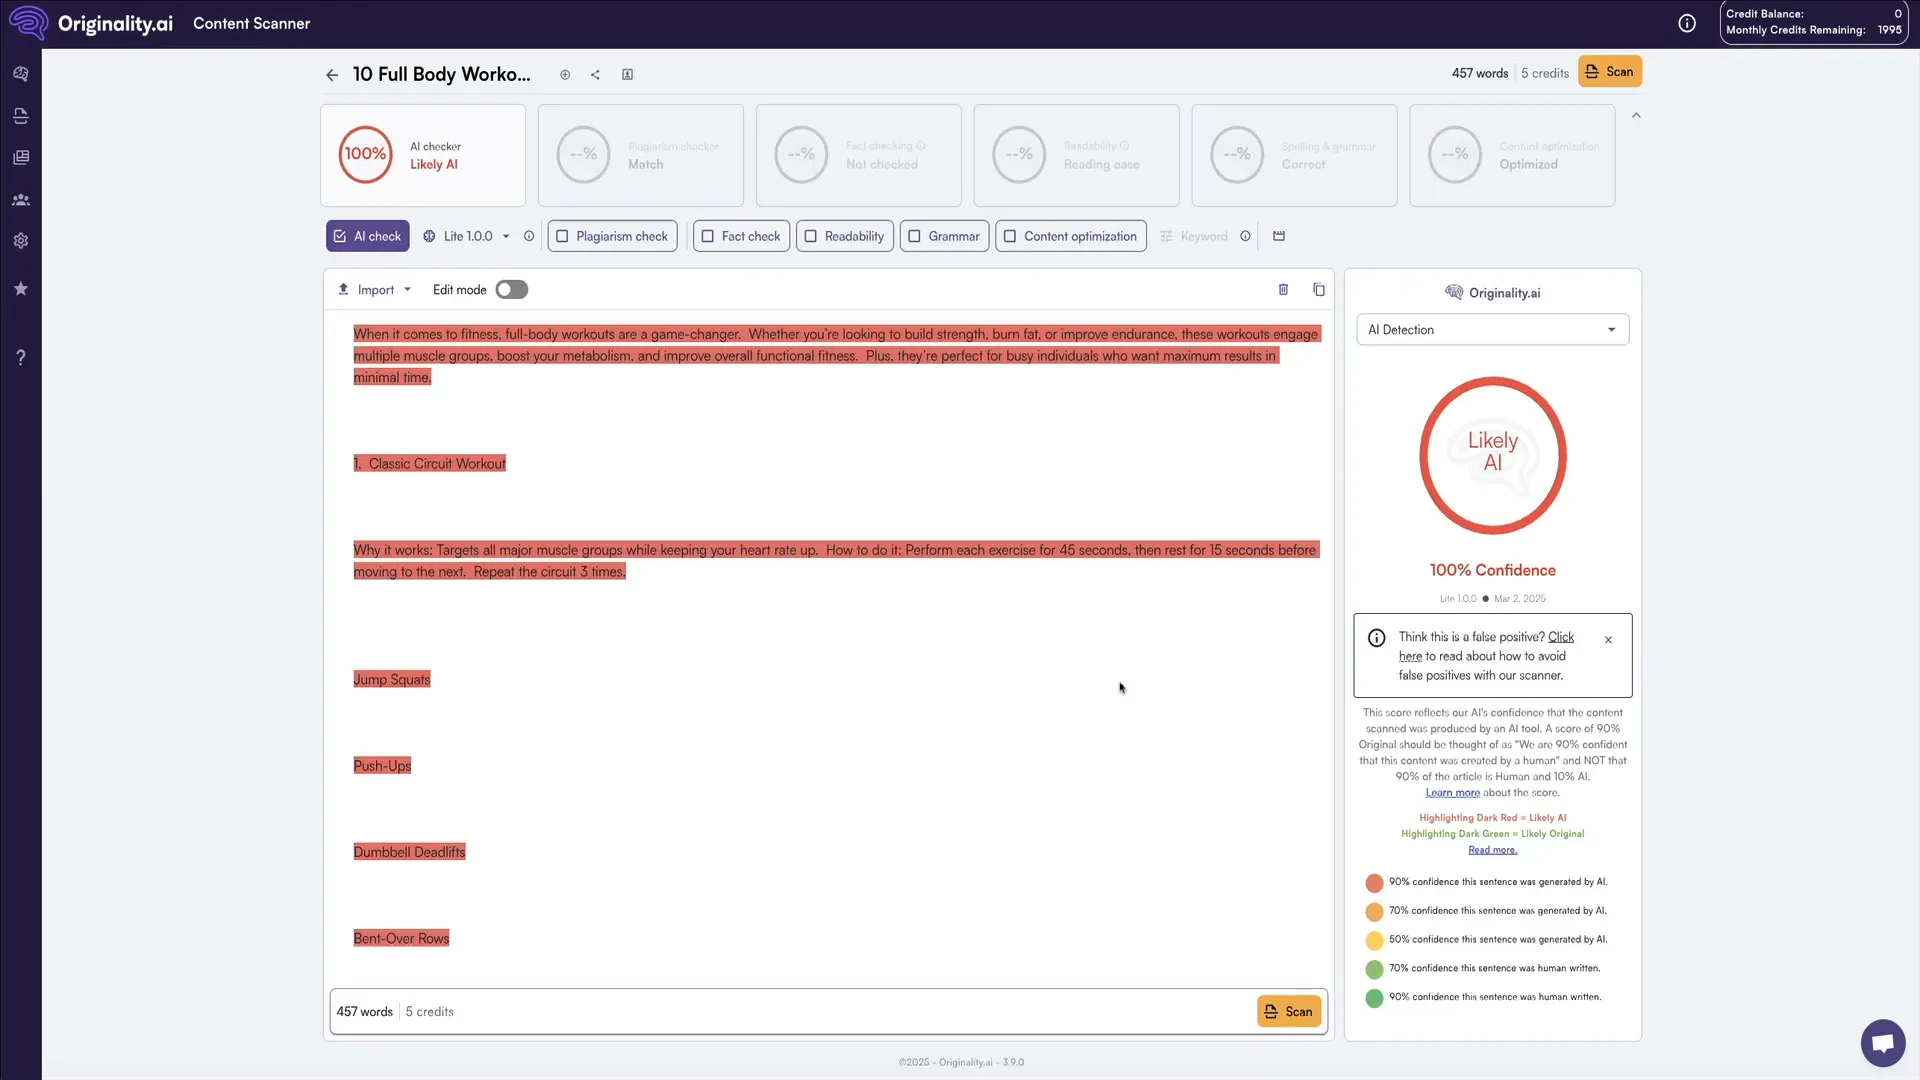
- On the right side, find the Originality AI tab. If it’s not open, click on it to access the settings.
- Select your desired detection model from the options provided: Light Model, Turbo 3.0 Model, or Multilanguage Model.
- Click the Start New Scan button to begin the analysis.
The plugin will quickly process your content and provide you with results indicating whether the post is likely AI-generated.
Step 5: Exploring the Plugin Features
The Originality.ai plugin is packed with features designed to enhance your content verification process. Let’s delve into some of the standout functionalities that make this plugin a must-have for any serious content creator.
- Multiple Detection Models: Choose from the Light Model, Turbo 3.0 Model, or Multilanguage Model based on your specific needs.
- In-depth Analytics: Access detailed reports and analytics that provide insights into your content's authenticity.
- Editing Capabilities: The built-in edit mode not only allows you to view AI-generated text but also to make changes seamlessly.
- Plagiarism and Fact-Checking: Ensure your content is not only original but also accurate with integrated plagiarism and fact-checking tools.
Step 6: Enhancing Content with Edit Mode
Edit mode is one of the most powerful features of the Originality.ai plugin. It allows for a fluid transition between scanning for AI-generated content and editing your text directly within the platform. This means you can refine your work without toggling between different tools, saving you time and effort.
When you activate edit mode, the detected AI text will be highlighted, making it easy to identify and modify flagged sections. You can rewrite or enhance these parts to improve originality. Plus, standard text formatting options are available, so you can structure your content as needed.
Step 7: Scanning Entire Websites
For those managing multiple pages or entire sites, the capability to scan an entire website is particularly beneficial. This premium feature allows you to assess the originality of all your content in one go.
To perform a site-wide scan, navigate to the website tab in the plugin menu. Here, you can initiate scans that cover every post and page on your site, ensuring that your entire content library meets authenticity standards.
Step 8: Additional Resources
To maximize your use of the Originality.ai plugin, consider exploring additional resources and support options. The following can enhance your experience:
- Originality.ai Help Center: Access documentation and FAQs for quick answers to common questions.
- Community Forums: Engage with other users to share tips, tricks, and experiences.
- Webinars and Tutorials: Participate in sessions that provide deeper insights into using the plugin effectively.
Utilizing these resources can help you stay updated and make the most of your Originality.ai experience.
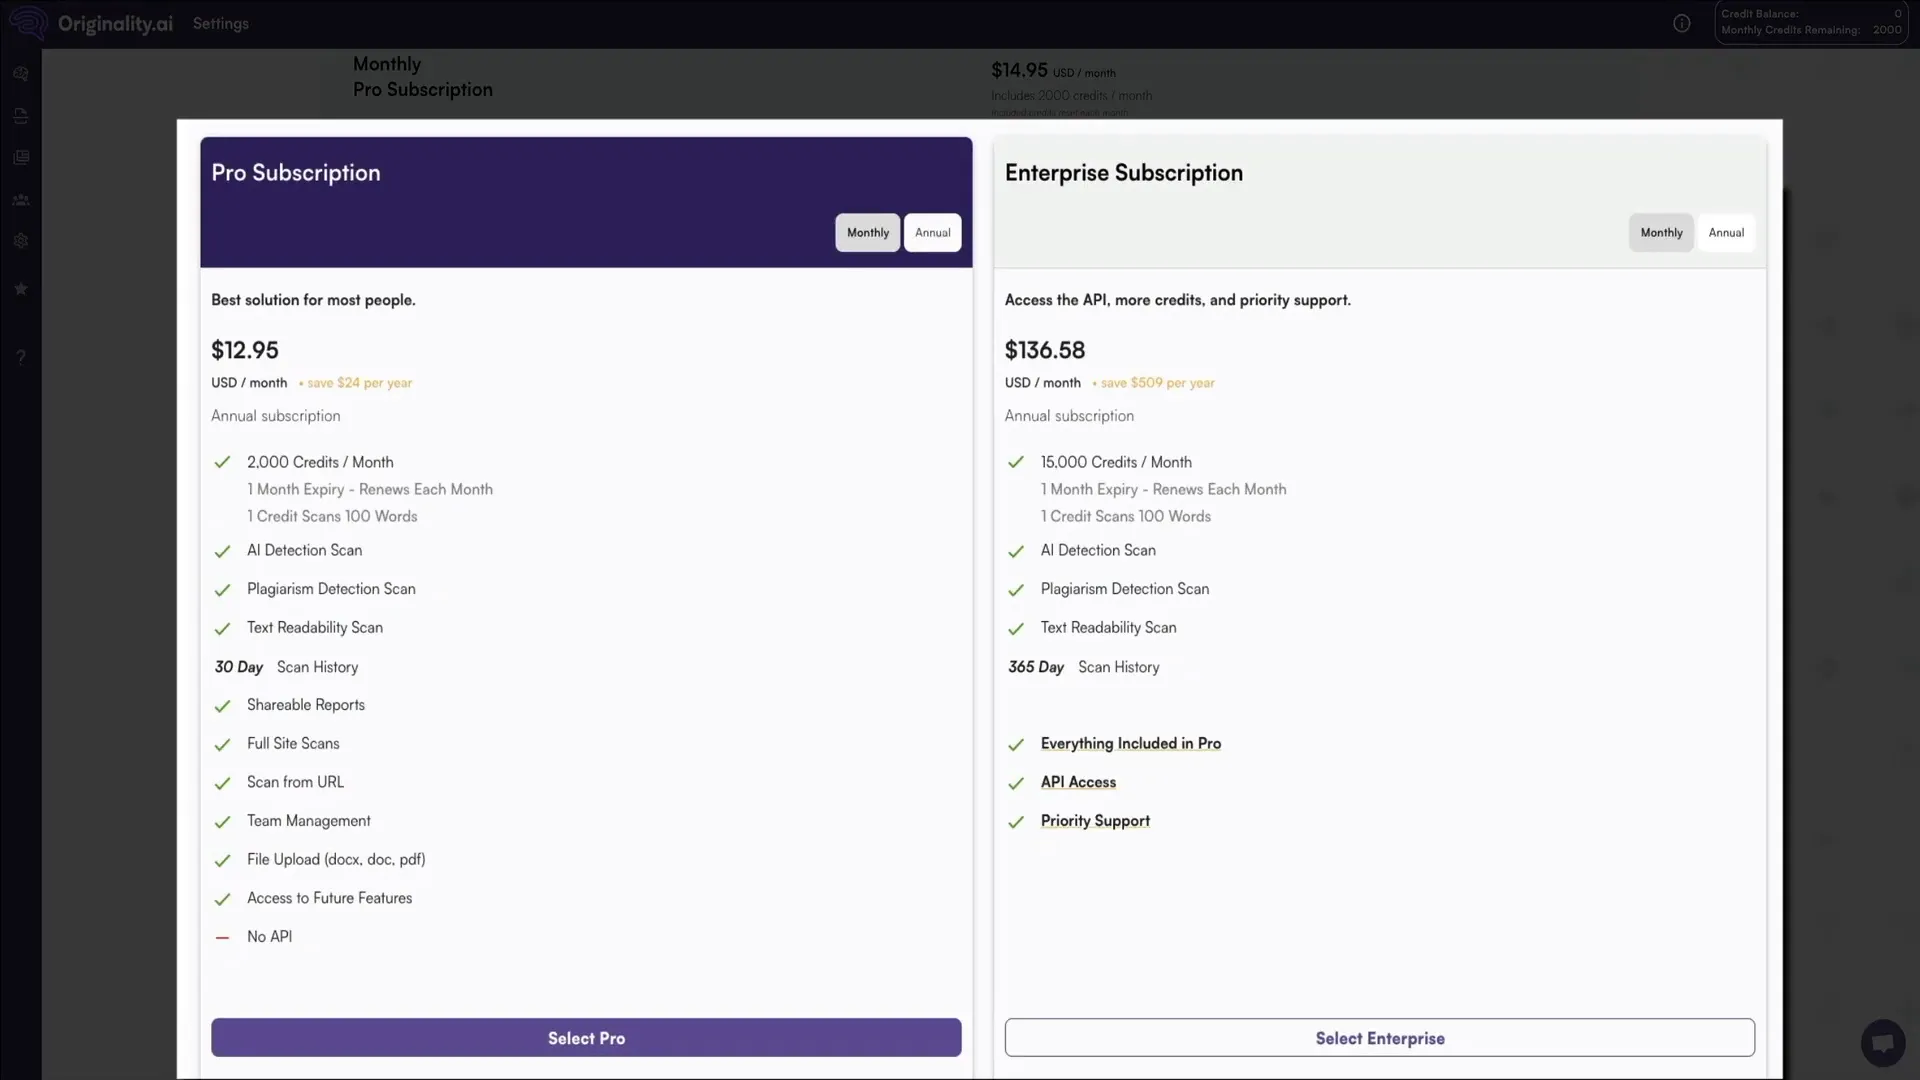
Step 9: Pricing & Plans
If you find the Originality.ai plugin valuable, consider upgrading to a paid plan for enhanced features. Here’s how you can explore your options:
- In your Originality.ai dashboard, hover over the gear icon in the sidebar and select Settings.
- Click on Subscription to view the available plans.
- Currently, there are two options: Pro and Enterprise, each with monthly and annual subscriptions. Upgrading grants you more credits for scans, additional features, and priority support.
Investing in the Pro plan can significantly enhance your content verification capabilities.
Step 10: Final Thoughts
In wrapping up this Originality.ai tutorial, it’s clear that maintaining originality in our content is not just a trend; it's a necessity. The Originality.ai plugin offers invaluable tools that empower content creators to uphold authenticity. Whether you're a blogger, marketer, or any form of content creator, this plugin simplifies the process of ensuring your work is genuinely yours.
With its user-friendly interface and powerful detection capabilities, Originality.ai helps you navigate the complexities of AI-generated content. By integrating this tool into your workflow, you can confidently publish material that meets the standards of originality.
In this Originality.ai tutorial, I’ll guide you through the powerful features of the Originality.ai WordPress plugin, designed to help content creators ensure their work is authentic. With seamless integration into your WordPress dashboard, this tool allows you to scan posts and entire sites for AI-generated content in just a few clicks.
Step 1: Intro
In today’s digital landscape, the authenticity of content is paramount. As content creators, bloggers, or website owners, we must be vigilant about the originality of what we publish. With AI-generated text evolving rapidly, distinguishing between human-written and machine-generated content has never been more challenging. That's where the Originality.ai plugin shines, providing a reliable solution directly within your WordPress dashboard.
Step 2: Getting Started – How to Install the Plugin
To begin your journey with Originality.ai, the first step is installing the plugin. Here’s how to do it:
- Navigate to your WordPress dashboard.
- Hover over Plugins and click on Add New.
- In the plugin library's search bar, type Originality AI. It should be the first result.
- Click the Install button, followed by the Activate button to enable the plugin.
Congratulations! You’ve officially installed the free version of the Originality.ai plugin on your WordPress site. If you want to access more features, consider upgrading to a pro plan later on.
Step 3: Account Setup
After installation, the next step is to create your Originality.ai account. Follow these straightforward steps:
- Locate the link that says click here to go to plug-in settings or hover over Settings in the left sidebar and select Originality AI.
- On the settings page, click the Sign Up link. You can either enter your email address and create a password, or sign in using a Google account.
- Once connected, you’ll be redirected to your Originality.ai account dashboard. This dashboard offers a comprehensive interface for managing your scans and settings.
Step 4: AI Content Check
Now comes the exciting part—using the plugin to detect AI-generated content. Here’s how to get started:
- In your WordPress dashboard, navigate to the Posts section.
- Select the post you wish to scan by clicking on Edit.
- On the right side, find the Originality AI tab. If it’s not open, click on it to access the settings.
- Select your desired detection model from the options provided: Light Model, Turbo 3.0 Model, or Multilanguage Model.
- Click the Start New Scan button to begin the analysis.
The plugin will quickly process your content and provide you with results indicating whether the post is likely AI-generated.
Step 5: Exploring the Plugin Features
The Originality.ai plugin is packed with features designed to enhance your content verification process. Let’s delve into some of the standout functionalities that make this plugin a must-have for any serious content creator.
- Multiple Detection Models: Choose from the Light Model, Turbo 3.0 Model, or Multilanguage Model based on your specific needs.
- In-depth Analytics: Access detailed reports and analytics that provide insights into your content's authenticity.
- Editing Capabilities: The built-in edit mode not only allows you to view AI-generated text but also to make changes seamlessly.
- Plagiarism and Fact-Checking: Ensure your content is not only original but also accurate with integrated plagiarism and fact-checking tools.
Step 6: Enhancing Content with Edit Mode
Edit mode is one of the most powerful features of the Originality.ai plugin. It allows for a fluid transition between scanning for AI-generated content and editing your text directly within the platform. This means you can refine your work without toggling between different tools, saving you time and effort.
When you activate edit mode, the detected AI text will be highlighted, making it easy to identify and modify flagged sections. You can rewrite or enhance these parts to improve originality. Plus, standard text formatting options are available, so you can structure your content as needed.
Step 7: Scanning Entire Websites
For those managing multiple pages or entire sites, the capability to scan an entire website is particularly beneficial. This premium feature allows you to assess the originality of all your content in one go.
To perform a site-wide scan, navigate to the website tab in the plugin menu. Here, you can initiate scans that cover every post and page on your site, ensuring that your entire content library meets authenticity standards.
Step 8: Additional Resources
To maximize your use of the Originality.ai plugin, consider exploring additional resources and support options. The following can enhance your experience:
- Originality.ai Help Center: Access documentation and FAQs for quick answers to common questions.
- Community Forums: Engage with other users to share tips, tricks, and experiences.
- Webinars and Tutorials: Participate in sessions that provide deeper insights into using the plugin effectively.
Utilizing these resources can help you stay updated and make the most of your Originality.ai experience.
Step 9: Pricing & Plans
If you find the Originality.ai plugin valuable, consider upgrading to a paid plan for enhanced features. Here’s how you can explore your options:
- In your Originality.ai dashboard, hover over the gear icon in the sidebar and select Settings.
- Click on Subscription to view the available plans.
- Currently, there are two options: Pro and Enterprise, each with monthly and annual subscriptions. Upgrading grants you more credits for scans, additional features, and priority support.
Investing in the Pro plan can significantly enhance your content verification capabilities.
Step 10: Final Thoughts
In wrapping up this Originality.ai tutorial, it’s clear that maintaining originality in our content is not just a trend; it's a necessity. The Originality.ai plugin offers invaluable tools that empower content creators to uphold authenticity. Whether you're a blogger, marketer, or any form of content creator, this plugin simplifies the process of ensuring your work is genuinely yours.
With its user-friendly interface and powerful detection capabilities, Originality.ai helps you navigate the complexities of AI-generated content. By integrating this tool into your workflow, you can confidently publish material that meets the standards of originality.

Written by Ben Cummings
Co-Founder of Sage Wave Media
Ben is the Co-Founder of Sage Wave Media, LLC which is the parent company of Blog With Ben. He enjoys teaching, blogging, startups, a hoppy IPA, and college basketball. Whenever he's not blogging, you can find him cruising around sunny San Diego with his amazing family.
0 Comments